This was not as good a winter for my bees as last year was, for sure- I have so far lost two of my four large hives. However, I was happy to see these two hives flying the other day during a brief warm spell! If they survive til Spring, I'll be splitting them into 4 hives just as soon as there are drones flying. Hope springs eternal!
Friday, February 22, 2013
my bees in Winter
This was not as good a winter for my bees as last year was, for sure- I have so far lost two of my four large hives. However, I was happy to see these two hives flying the other day during a brief warm spell! If they survive til Spring, I'll be splitting them into 4 hives just as soon as there are drones flying. Hope springs eternal!
Wednesday, December 19, 2012
Candles from my own beeswax.
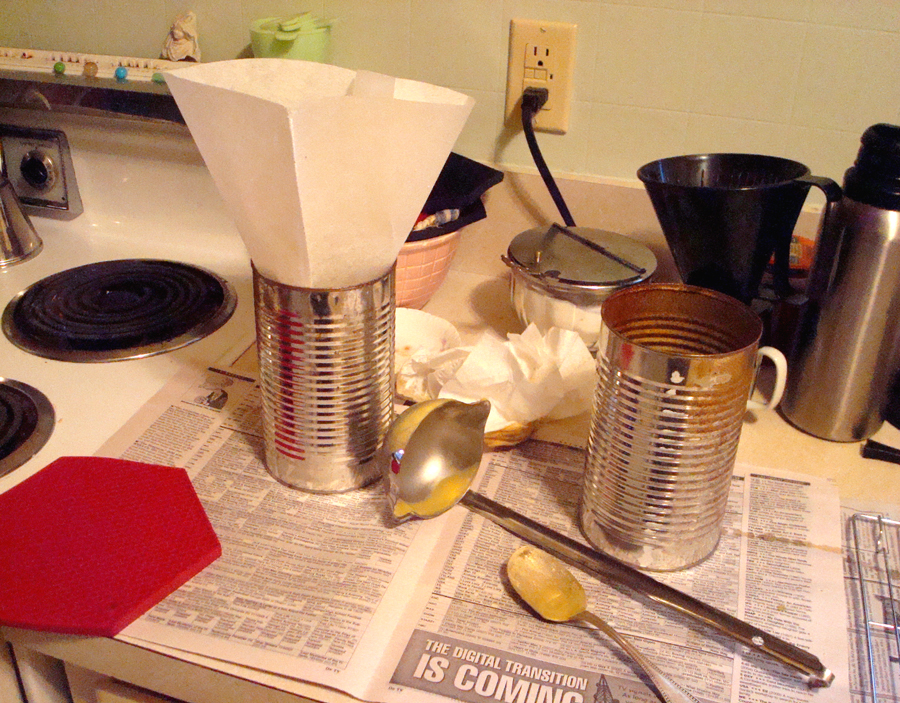
After cleaning and filtering the discs of wax from my 'crush and strain' method honey harvest shown in my last post, I ended up with two and a half pounds of pure clean beeswax from my own bees. As a last filtering, I melted the wax in a double boiler and then poured it through a restaurant style grease filter cone, which I set in an empty pineapple juice can (see photo).
I had two flexible silicone candle molds- one to make plain votives with pointed tops, and the other for votive-sized bee skep shaped candles. It was fun to set the wicks, pour the candles with a spouted canning ladle, and then carefully pop them out after cooling for about a half hour. Later, the candle bottoms were pressed onto a hot skillet to get them nice and flat.
Altogether, I was able to make 20 candles from the 2.5 lbs of wax- nine little skeps and 11 tall votives, plus a short 1" votive with the last drips of wax. Next year I will buy another mold or two for added variety.
I got my candles done just in time before Christmas...a nice way to end my beekeeping year and bring a warm glow to the dark days to come this winter.
(Click on each picture to see it larger and more detailed.)
(Click on each picture to see it larger and more detailed.)


Sunday, November 11, 2012
Honey harvest 2012
I harvested two medium sized boxes of honey from my two most populated hives this year. I did not try to harvest honey from my other three hives, I just let them be.
From the 16 or so medium frames mostly full of honey, I used the low tech 'crush and strain' method again this year and wound up with a harvest of about 4 gallons- 42 pounds of pure honey, and a nice chunk of wax. Here is the honey harvest all bottled up in various large one and two pound jelly and peanut butter jars I saved up over the past year...I also filled two dozen little half pint jars which will make nice holiday gifts...

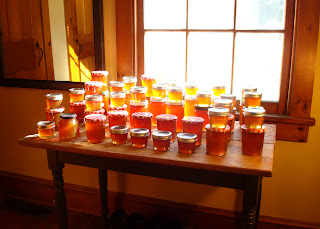


From the 16 or so medium frames mostly full of honey, I used the low tech 'crush and strain' method again this year and wound up with a harvest of about 4 gallons- 42 pounds of pure honey, and a nice chunk of wax. Here is the honey harvest all bottled up in various large one and two pound jelly and peanut butter jars I saved up over the past year...I also filled two dozen little half pint jars which will make nice holiday gifts...


I am ordering a
couple of candle molds and wicking in order to make a few little votive
candles from the chunk of golden beeswax I got as well. I think I have
enough wax to make about a dozen votive candles. It'll be nice to have
the scent of our own beeswax candles in the house during the bleak late winter.


Tuesday, August 7, 2012
Tomato season, finally!
Several of today's tomatoes, plus a jar of last year's honey from our own bees.
The big pinkish tomato is one of my favorite variety, Prudence Purple...


The big pinkish tomato is one of my favorite variety, Prudence Purple...


Sunday, June 3, 2012
A new black queen
Last month in May, I split one of my hives and left the queenless half to make a new queen for themselves from existing eggs in the hive. Today, about a month later, I checked in to see if there was a new laying queen. Success! There she was, and there was fresh brood in the hive, proving she was already laying.
I was surprised at the new queen's appearance- she is mostly black, and seems a bit longer than my other queens.
When you let your bees raise queens from whatever bees are in your local area, you never really know what combination you'll get. Could be good or not so good, but I figure they will at least be semi-acclimatized to our northern winters.
Some beekeepers like to keep more control on their hive genetics, but for me as a hobbyist, diversity is all part of the fun. I also know there is at least one longtime feral bee colony just a half mile from me- I hope this new queen is partly related to them! I plan to make at least one daughter from this black queen later this month, to see how well her genetics do in surviving a cold winter.


Tuesday, April 24, 2012
Spring bicycles
The other day we rode our bikes into town and parked them in front of the cafe to have breakfast with friends. The pear tree was blooming and it looked so pretty that I took a photo.

Sunday, April 22, 2012
Mason bee females beginning to nest, April 2012
Here is a little video taken a few days after the first video.
Instead of seeing bunches of eager males buzzing around focused on last year's tubes from which the females are beginning to emerge, in this new video we see females intent on choosing tubes to begin laying in. There are many horn faced mason bees and quite a few eastern Blue Orchard mason bees as well. Most of the bees you see now are the females, having mated already and beginning their nesting activities. The females are a bit larger and heavier than the males. Males have long antennae and sometimes a little white mustache!
More females will continue to emerge from the old tubes for another week or two, and there are males loitering around the area hoping for that possibility...lol! But the bees in the video that are actively rushing in and out of the new tubes now are almost all nesting females.
Saturday, April 21, 2012
Mason bees emerging and mating April 2012
In this video I describe what is going on at the nesting site on my porch. We have a new nesting box put up, with a capacity of 450 nesting straws, each of which can accommodate 4-6 cocoons.
Many male horn faced mason bees are the first to emerge this Spring and are impatiently waiting for the females to emerge. Males emerge first, females can take up to about 2 weeks before they all emerge. There are also blue orchard bees nesting here. Last years nesting tubes with cocoons are in the bags to the left, while the new clean nesting straws are in the box ready for the females to lay in this year.
Sorry about the occasional wind noise in the video.
Tuesday, April 10, 2012
Two honeybee queens
It was a mild winter, and I was lucky to have all five of my honeybee colonies make it through to Spring. Two of them were baby hives- five frame 'nucs' (nucleus colonies). Those two nucs I sold a couple of weeks ago to a beekeeper who lost all their hives this winter. This helped offset the cost of buying hive equipment, and enables me to free up some space to make more new nucs later.
Now that leaves me with three full sized hives- two in my backyard and one down the road at a friend's house.
It's still cold at night here in the 30's, so the bees are not in full speed laying mode yet. A couple weeks ago I switched their brood boxes vertically, to put each brood nest down in the bottom box and an empty comb brood box on the top for each hive to expand upwards into.
Today I checked my two home hives, which I call Aurora and Maybelle, to see if their populations were doing well and their queens laying.
As I expected, Aurora hive (which is in a slightly shadier location) had a small patch of brood and small population. But there were eggs and brood, and I took a few nice pictures of Aurora's lovely queen. Click on the photos to see them full size with lots of detail:


Thus, though Aurora's population is low, the queen seems to be laying and may be getting a slow start simply due to the current chilly weather and her slightly shadier location.
I moved on to inspect my Maybelle hive and was pleased that there were many bees and a lot more brood. I expected to see this due to the busy traffic going in and out of that hive. Again I found the queen in Maybelle hive, and photographed her. She looked a little more golden colored. I took the opportunity of removing a frame with brood and nurse bees from Maybelle hive and giving it to Aurora as a little boost. When moving a frame from one hive to another, I only include the nurse bees on a frame of brood if I have located the queen first, so that I don't accidentally move her as well! I replaced the stolen frame with an empty frame from Aurora back to Maybelle.
Things seemed just fine in Maybelle with a good amount of brood in progress, and I closed everything up.
It was obvious that it would be a while yet before being able to make any new nucs or splits off these hives, or to bother trying to prevent a swarm, or put on honey supers. They both still had a full 10 frame deep of totally empty drawn comb frames in their top brood boxes. The Spring nectar flow has not started in earnest yet even though dandelions are beginning to bloom in some spots. I expect everything to get on the fast track in a couple more weeks, towards the end of April.
Later on my computer, I looked over the queen photos I had taken this morning. I knew which queen photos were from which hive. I was very surprised to see that the queen in Maybelle (with the better brood production) actually had a dent in her thorax that surely must affect her health in some way sooner or later. It was quite clear in the photos. I don't think the dent happened today, because I was very careful and gentle when I removed frames to look at her brood area today. The dent looked like it might have been there a while, but hard to tell. Obviously, this dent has not interfered yet in her Spring laying, but I can't help but now think it might be good to replace her later this Spring with her own daughter. I wouldn't choose to replace her right now, since she is laying well and it's a critical time right now with the cold weather and not an abundance of drones yet.
The dent was not visible at all when I was looking directly at her through my veil, but it's quite plain to see in these photos:


Just goes to show you the value of taking photographs of your bees once in a while!
The queen in Aurora hive, meanwhile, looked perfect and had a very black shiny thorax, easy to see her. I remember seeing her just once after she was born last year, June 2011, and I had written down that I noticed her pretty 'toasted' color appearance. She will be 1 year old this June, and I suspect she will be laying just fine after Spring warms up a little more. Aurora was the hive from which I got my one unexpected harvest of a medium super of honey last Fall, yielding my first one gallon honey harvest.
Sunday, March 18, 2012
A new bigger mason bee box
Brian made a new nesting box for our expanding solitary/native/mason bee population. This box holds a total of over 400 nesting straws, in 6 large cans. I found that large pineapple juice cans are just the right size for the nesting straws. This one box actually holds more nesting straws than all three of my previous nesting boxes from last year combined, yet it's much easier to maintain and clean. Click the image to enlarge it for viewing:


The chicken wire front keeps out woodpecker and squirrel predators. We can make a second identical box if need be, and hang it directly below this one. A second box may not be necessary this year. I anticipate that my immediate neighborhood would likely not support more mason bees than two of these boxes could possibly house- there is a limit to the local food/pollen supply after all. Honeybees can travel several miles for forage, but little solitary bees only forage a few hundred yards from their home base, thus their population is self-limiting based on the food supply in any given area.
In a few days I'll be putting the chilled dormant cocoons from last year out to emerge right next to this new nesting box. I'm just waiting until a few more flowers are blooming. It's a very early Spring here, but the fruit trees are still not flowering. Right now my 2011 cocoons containing new adult bees are still sleeping safely in my refrigerator veggie crisper drawer. It's almost time for emergence! A couple of days ago I was planting pea and spinach seed in my vegetable garden, and several male mason bees kept landing on my periwinkle blue skirt, apparently mistaking me for a giant morning glory. They were so sweet, but I felt a little sorry for them since not much is blooming yet. Obviously they were local wild bees who had emerged a bit early due to the unusually warm weather. It's quite possible that some of those bees will find this box and use it before my refrigerated bees are put out to emerge and mate. Some of the straws have paper liners that carry the scent of last year's nesting activities, and that's a powerful lure to any nearby mason bees looking for nesting sites.
I really look forward to seeing this new elegant box bustle with nesting bees!
Tuesday, October 11, 2011
First Honey Harvest!
My first small honey harvest at "Wayward Girl Apiaries"...lol!...
One afternoon last week I put a triangle bee escape in place under the one half-empty medium honey super that I had on my biggest hive since mid summer (after they successfully re-queened themselves from eggs). The nights are dipping into the 30's and 40'sF now on and off, so I figured I needed to pull that super off and be done with it before super cold weather sets in here. A day and a half later I took off the super and brought it into the garage, where I shooed about 5 straggler bees out before bringing it into my kitchen.
Those triangle escapes work quite nicely! They are like a maze where the bees can leave the honey super but they can't find their way back in, or at least they can't figure it out for a day or two. No need for those stinky chemical bee repellents to clear the bees out of honey supers. Low tech rules.
The 10 frame medium super had been foundationless, with popsicle stick guides. I hadn't really expected the bees to build it all out from nothing in mid summer, but they did complete a few frames and started a few others. I had 4 frames that were mostly all capped honey on both sides, and two more frames that had about half their areas capped....so a total of about 5 frames of mostly capped honey, a little bit empty around the frame edges where the comb floats free.
I picked off only about 6 dead bees- there was no brood in the comb either (I had placed a queen excluder after they started capping honey several weeks ago)- nice clean new honeycomb! I would have made some jars of chunk honey IF I had had a bunch more, but I wanted as much liquid honey for my tea this winter as I could get. With a knife, I cut the slabs of capped comb into a big bowl. Then I used my hands to squeeze and break up all the comb into a mush...that was fun! I think being careful about squishing every little chunk of comb up yields the most honey in the end. This is the 'crush and strain' method of honey harvesting, for people who haven't bought a frame-spinning extractor machine yet.
I had bought a 5 gallon double stacking bucket setup for straining and draining honey, with a fine strainer net and sieve and a honey gate spigot. I didn't really have enough honey to justify using the big bucket set this time, but I wanted to test it all out anyway so I'd be an old hand next year when I (hopefully) get a good Spring harvest.
The bucket strainer setup was very nice and convenient. After thoroughly squishing the comb and honey with my hands into a mash about the consistency of thick apple sauce, I used a rubber baking spatula and scraped every last bit into the net mesh in the top bucket. Right away it began to drip into the bottom bucket, which was gratifying!
I sat the bucket stack on a table in the sunny windowsill to make it as warm as possible. I let it continue to drip through the sieve-net for 48 hours. During the day the sun warmed the draining buckets by the window, and at night I threw a tablecloth over it and the nearby lamp to keep the whole thing flowing, since our house is about 65F at night now. Honey flows better when it's not cool. The lamp kept the buckets at about 75-80F. You never want to actually heat honey, which destroys some of its health benefits... but a nice warm room temperature keeps things flowing and draining nicely.
I set the empty messy honey super outside, and the bees have been happily cleaning it up for me- they remove every speck of honey and leave only the carefully cleaned comb for me to then store in the basement til Spring.
After two days dripping from the netting bag, it looked like I had about a GALLON of pure honey in the lower bucket- way more than I thought I would get!
I used the spigot to fill various clean jars I had been saving. Honey can be stored just as is in clean jars- no need to 'can' it or process it. Pure honey honey doesn't spoil. Sort of a hodge-podge of jar sizes and shapes, but no matter- the honey tastes WONDERFUL!!! Very potent 'honey' taste, nothing like sugar syrup for sure. I can't detect any distinctive floral notes, but it was made during a time when the Japanese Knotweed and goldenrod were in full bloom around my neighborhood. It does look to me as though we got just about a gallon of honey all told.
After cleaning the buckets and bottling area of the kitchen, I placed the leftover grapefruit-sized clump of wax crumble-goo into a doubleboiler saucepan, with about a cup of water. It was quite gooey, but you couldn't really squeeze any honey out of it anymore. I gently heated it in the double boiler til the whole thing was liquid. I stirred and scooped a little strainer through it to remove the brownish globs of pollen residues that had been in some of the comb cells. As soon as it cooled, a beautiful bright yellow disc of pure beeswax formed and floated on top of the now dark honey-water. The two layers were perfectly separated. When cool, I merely lifted the hard wax disc off the top and you can see how lovely it is- enough to make about three votive candles I'm guessing! I think I'll order some wicks, I'll need them next year anyway. Once I took off the beeswax, I put a cookie tin out in the vegetable garden and poured the leftover honey-water in it for the bees to drink- They can evaporate and recycle it into honey for their own winter use. Before I had even finished pouring it into the cookie sheet, two girls were already at the edge of the pan, drinking! I lay some pine branches in the liquid to give the bees places to crawl out and not drown. Nothing went to waste.
I love knowing that there have been no chemicals at all added to the hive or treated on my bees. I can't control the things my bees may get into out in the surrounding neighborhood, but this honey is from completely untreated bees foraging food all on their own, and that means a lot to me. We live in a small rural village surrounded by many farms, fields and hills of wild flowers, forests, etc. Plenty of bee forage of all kinds here.
If you click on a picture it was enlarge.


In my 3 seasons of keeping bees, I think probably the most profound thing I have learned is this:
A beehive is not a permanent thing. Colonies survive and die, all workers die within 8 weeks and are replaced by an entirely new population of bees, queens get replaced or swarm off... your boxes may stay there appearing unchanged, but in reality the bee colony inside is a work in progress that is constantly evolving and changing, with or without your actions. So have fun with your boxes of insects and learn cool stuff by creating and un-creating new colonies!Think of all your colonies with less than 10 frames as 'experimental temporary holding boxes'- they can be viewed as not actual hives. Call your nucs 'comb producing boxes' or 'brood booster boxes'. That way, you can keep claiming you only have 3 hives in your backyard and you can have fun with various other 'experimental colonies' piled here and there. ;D Then in the Fall some will have faded out and the healthiest ones can be consolidated or just disassembled if you choose and used to boost your REAL hives for the winter. Or bundle them up against the wind and see if any survive the winter. If you go into winter with a couple of extra cards up your sleeve, you are more likely to have survivors in the Spring to work from. This is the most valuable thing I have learned so far.
Sunday, September 25, 2011
My bees in September
Here are 4 of my 5 honeybee colonies in late September on a nice sunny day. I also have one more large hive down the road not shown here.
These are two full sized hives and two 5-frame nucs (baby hives). I am hoping to bundle the two little nucs together and attempt to overwinter them.
It was quite a busy day for them, all in a mad rush bringing in nectar and pollen. Our area is in the midst of goldenrod bloom right now.
These are two full sized hives and two 5-frame nucs (baby hives). I am hoping to bundle the two little nucs together and attempt to overwinter them.
It was quite a busy day for them, all in a mad rush bringing in nectar and pollen. Our area is in the midst of goldenrod bloom right now.
Friday, July 22, 2011
Spicy Dill Pickles with Peppers and Garlic
Yesterday I made my second batch of pickles for the year. I'm getting a lot of pickling cucumbers from the garden right now. This time I added some garlic cloves, spices, and pepper strips to each jar, including a sliced whole small hot green pepper. I wound up with a total of 27 quarts' worth, and it took most of the day. I haven't tasted them yet, but they look pretty good. Sheba (aka "Boo-Boo") investigated the jars before I stored them away. (click pictures to enlarge)


Sunday, July 17, 2011
More red cabbage salad

We ate up the first batch of cole slaw pretty quickly.
With the other half of the giant red cabbage from the garden, I made a sort of Mexican style vinaigrette slaw and added black beans, corn, cilantro, red peppers, onions (including their scallion tops), and chipotle sauce.
Friday, July 15, 2011
Red Cole Slaw and first Green Beans
I cut the largest head of red cabbage from my vegetable garden and made cole slaw. Also from the garden I added to it shredded carrot, chopped kale, and red onion. A touch of chopped store bought yellow pepper added some pretty yellow color. I made the slaw dressing with mayo, yogurt, mustard, lemon juice, vinegar, salt, black pepper, celery seed, and dill.
That head of cabbage was about the size of a volleyball, and only half of it made a BIG bowl of cole slaw. Now I'll have to decide what to do with the other half. Then there are three more cabbages growing... but happily they are maturing a various rates so I'll be able to harvest them over the next month or so.
I also picked the first batch of tender green beans. We'll have them steamed and buttered, alongside wild rice for dinner tonight...
The Vidalia, red, and white onions will need to be pulled and dried for storage soon- their tops are flopping over, but are still green. When the tops begin to turn yellow the onions have stopped growing and should be harvested.
(click photos to enlarge)


Monday, July 11, 2011
Dill Pickles
Today i made my first batch of pickles for the year- dill spears. I picked a whole sinkful of pickling cukes and they made about 14 quarts' worth of dill pickle spears. Used up the 12 quart jars I had pretty quickly, and some extra pint jars too.
Brian likes dill spears, I prefer sweet pickles, so next I'll make a batch of sweet chunk pickles for me. After that, I will need to make some cole slaw from the big heads of red cabbage growing in the garden.
My cucumber vines look like they'll be giving me 2 or 3 more batches for pickles equal in size to this one, so I'll need to buy more quart jars and a couple more gallons of vinegar. My bees are doing a great job pollinating the cucumber blossoms- they are buzzing all over them all day long.


Tuesday, July 5, 2011
A new Queen
I managed to get a couple of quick pictures of the new queen honeybee whom I've named "Calico". She came from a queen cell that I swiped from my Old Queen's hive to a new small 5-frame hive 'nuc' with. She emerged in her new nuc, took her mating flight last month, and has been laying wonderfully. I've been taking out frames of her eggs to give to my other hives now, for them to make new queens from as well. She seems like a winner, and it was hard to get a photo of her because she kept running so fast to the other side of the frame I was holding up for the photo- she was trying to get away from the bright sun. She's quite a golden beauty!


(click on the photos and you'll see them bigger)


Wednesday, May 25, 2011


Monday, May 16, 2011
The Old Queen, and a New Queen cell...
I split my main 2nd year beehive four days ago. I took out the queen and put her in a new hive along with several frames of brood, bees, and honey. I left the main hive where it was to let them raise their own new queen from eggs.
Today, four days later, I checked in to see how both halves were doing...
In the new hive with the old queen, I located her, looking healthy and regal on a frame of capped worker brood. In the second photo, note how the other bees surround her attentively, like Ladies in Waiting!


There was plenty of healthy looking capped brood on the frames in the old queen's new hive...

Here is a short video I took of the queen while i had my camera in hand. Once in a while I point to the queen with my gloved finger so as not to lose sight of her amongst all the other bees:
Next... I closed up that hive and then looked for newly made queen cells in the now queenless original hive. See the one large queen cell at the top of the hive frame here:

Here you can see the queen cell. You can just see the butt end of a worker bee inside it, attending to the young queen larvae. Nearby you can see a few cells with regular worker larvae in them- the white larvae curled up in the bottoms of the brood cells.

If you look carefully inside the queen cell, you can see a large soft white larvae curled up in a "C" shape inside the queen cell, bathed in royal jelly. In a few more days the cell will be closed up and the new queen will finish her pupae stage for another few days and then emerge as a new virgin queen, ready to take her mating flight.

Today, four days later, I checked in to see how both halves were doing...
In the new hive with the old queen, I located her, looking healthy and regal on a frame of capped worker brood. In the second photo, note how the other bees surround her attentively, like Ladies in Waiting!


There was plenty of healthy looking capped brood on the frames in the old queen's new hive...

Here is a short video I took of the queen while i had my camera in hand. Once in a while I point to the queen with my gloved finger so as not to lose sight of her amongst all the other bees:
________________________________________________________
Next... I closed up that hive and then looked for newly made queen cells in the now queenless original hive. See the one large queen cell at the top of the hive frame here:

Here you can see the queen cell. You can just see the butt end of a worker bee inside it, attending to the young queen larvae. Nearby you can see a few cells with regular worker larvae in them- the white larvae curled up in the bottoms of the brood cells.

If you look carefully inside the queen cell, you can see a large soft white larvae curled up in a "C" shape inside the queen cell, bathed in royal jelly. In a few more days the cell will be closed up and the new queen will finish her pupae stage for another few days and then emerge as a new virgin queen, ready to take her mating flight.

Subscribe to:
Posts (Atom)


