My first small honey harvest at "Wayward Girl Apiaries"...lol!...
One afternoon last week I put a triangle bee escape in place under the one half-empty medium honey super that I had on my biggest hive since mid summer (after they successfully re-queened themselves from eggs). The nights are dipping into the 30's and 40'sF now on and off, so I figured I needed to pull that super off and be done with it before super cold weather sets in here. A day and a half later I took off the super and brought it into the garage, where I shooed about 5 straggler bees out before bringing it into my kitchen.
Those triangle escapes work quite nicely! They are like a maze where the bees can leave the honey super but they can't find their way back in, or at least they can't figure it out for a day or two. No need for those stinky chemical bee repellents to clear the bees out of honey supers. Low tech rules.
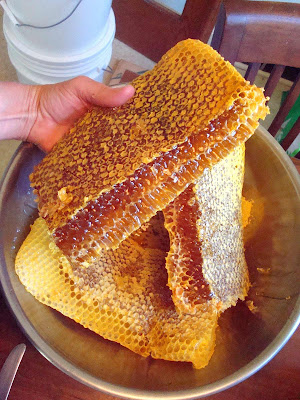
The 10 frame medium super had been foundationless, with popsicle stick guides. I hadn't really expected the bees to build it all out from nothing in mid summer, but they did complete a few frames and started a few others. I had 4 frames that were mostly all capped honey on both sides, and two more frames that had about half their areas capped....so a total of about 5 frames of mostly capped honey, a little bit empty around the frame edges where the comb floats free.
I picked off only about 6 dead bees- there was no brood in the comb either (I had placed a queen excluder after they started capping honey several weeks ago)- nice clean new honeycomb! I would have made some jars of chunk honey IF I had had a bunch more, but I wanted as much liquid honey for my tea this winter as I could get. With a knife, I cut the slabs of capped comb into a big bowl. Then I used my hands to squeeze and break up all the comb into a mush...that was fun! I think being careful about squishing every little chunk of comb up yields the most honey in the end. This is the 'crush and strain' method of honey harvesting, for people who haven't bought a frame-spinning extractor machine yet.
I had bought a 5 gallon double stacking bucket setup for straining and draining honey, with a fine strainer net and sieve and a honey gate spigot. I didn't really have enough honey to justify using the big bucket set this time, but I wanted to test it all out anyway so I'd be an old hand next year when I (hopefully) get a good Spring harvest.
The bucket strainer setup was very nice and convenient. After thoroughly squishing the comb and honey with my hands into a mash about the consistency of thick apple sauce, I used a rubber baking spatula and scraped every last bit into the net mesh in the top bucket. Right away it began to drip into the bottom bucket, which was gratifying!
I sat the bucket stack on a table in the sunny windowsill to make it as warm as possible. I let it continue to drip through the sieve-net for 48 hours. During the day the sun warmed the draining buckets by the window, and at night I threw a tablecloth over it and the nearby lamp to keep the whole thing flowing, since our house is about 65F at night now. Honey flows better when it's not cool. The lamp kept the buckets at about 75-80F. You never want to actually heat honey, which destroys some of its health benefits... but a nice warm room temperature keeps things flowing and draining nicely.
I set the empty messy honey super outside, and the bees have been happily cleaning it up for me- they remove every speck of honey and leave only the carefully cleaned comb for me to then store in the basement til Spring.
After two days dripping from the netting bag, it looked like I had about a GALLON of pure honey in the lower bucket- way more than I thought I would get!
I used the spigot to fill various clean jars I had been saving. Honey can be stored just as is in clean jars- no need to 'can' it or process it. Pure honey honey doesn't spoil. Sort of a hodge-podge of jar sizes and shapes, but no matter- the honey tastes WONDERFUL!!! Very potent 'honey' taste, nothing like sugar syrup for sure. I can't detect any distinctive floral notes, but it was made during a time when the Japanese Knotweed and goldenrod were in full bloom around my neighborhood. It does look to me as though we got just about a gallon of honey all told.
After cleaning the buckets and bottling area of the kitchen, I placed the leftover grapefruit-sized clump of wax crumble-goo into a doubleboiler saucepan, with about a cup of water. It was quite gooey, but you couldn't really squeeze any honey out of it anymore. I gently heated it in the double boiler til the whole thing was liquid. I stirred and scooped a little strainer through it to remove the brownish globs of pollen residues that had been in some of the comb cells. As soon as it cooled, a beautiful bright yellow disc of pure beeswax formed and floated on top of the now dark honey-water. The two layers were perfectly separated. When cool, I merely lifted the hard wax disc off the top and you can see how lovely it is- enough to make about three votive candles I'm guessing! I think I'll order some wicks, I'll need them next year anyway. Once I took off the beeswax, I put a cookie tin out in the vegetable garden and poured the leftover honey-water in it for the bees to drink- They can evaporate and recycle it into honey for their own winter use. Before I had even finished pouring it into the cookie sheet, two girls were already at the edge of the pan, drinking! I lay some pine branches in the liquid to give the bees places to crawl out and not drown. Nothing went to waste.
I love knowing that there have been no chemicals at all added to the hive or treated on my bees. I can't control the things my bees may get into out in the surrounding neighborhood, but this honey is from completely untreated bees foraging food all on their own, and that means a lot to me. We live in a small rural village surrounded by many farms, fields and hills of wild flowers, forests, etc. Plenty of bee forage of all kinds here.
If you click on a picture it was enlarge.


One afternoon last week I put a triangle bee escape in place under the one half-empty medium honey super that I had on my biggest hive since mid summer (after they successfully re-queened themselves from eggs). The nights are dipping into the 30's and 40'sF now on and off, so I figured I needed to pull that super off and be done with it before super cold weather sets in here. A day and a half later I took off the super and brought it into the garage, where I shooed about 5 straggler bees out before bringing it into my kitchen.
Those triangle escapes work quite nicely! They are like a maze where the bees can leave the honey super but they can't find their way back in, or at least they can't figure it out for a day or two. No need for those stinky chemical bee repellents to clear the bees out of honey supers. Low tech rules.
The 10 frame medium super had been foundationless, with popsicle stick guides. I hadn't really expected the bees to build it all out from nothing in mid summer, but they did complete a few frames and started a few others. I had 4 frames that were mostly all capped honey on both sides, and two more frames that had about half their areas capped....so a total of about 5 frames of mostly capped honey, a little bit empty around the frame edges where the comb floats free.
I picked off only about 6 dead bees- there was no brood in the comb either (I had placed a queen excluder after they started capping honey several weeks ago)- nice clean new honeycomb! I would have made some jars of chunk honey IF I had had a bunch more, but I wanted as much liquid honey for my tea this winter as I could get. With a knife, I cut the slabs of capped comb into a big bowl. Then I used my hands to squeeze and break up all the comb into a mush...that was fun! I think being careful about squishing every little chunk of comb up yields the most honey in the end. This is the 'crush and strain' method of honey harvesting, for people who haven't bought a frame-spinning extractor machine yet.
I had bought a 5 gallon double stacking bucket setup for straining and draining honey, with a fine strainer net and sieve and a honey gate spigot. I didn't really have enough honey to justify using the big bucket set this time, but I wanted to test it all out anyway so I'd be an old hand next year when I (hopefully) get a good Spring harvest.
The bucket strainer setup was very nice and convenient. After thoroughly squishing the comb and honey with my hands into a mash about the consistency of thick apple sauce, I used a rubber baking spatula and scraped every last bit into the net mesh in the top bucket. Right away it began to drip into the bottom bucket, which was gratifying!
I sat the bucket stack on a table in the sunny windowsill to make it as warm as possible. I let it continue to drip through the sieve-net for 48 hours. During the day the sun warmed the draining buckets by the window, and at night I threw a tablecloth over it and the nearby lamp to keep the whole thing flowing, since our house is about 65F at night now. Honey flows better when it's not cool. The lamp kept the buckets at about 75-80F. You never want to actually heat honey, which destroys some of its health benefits... but a nice warm room temperature keeps things flowing and draining nicely.
I set the empty messy honey super outside, and the bees have been happily cleaning it up for me- they remove every speck of honey and leave only the carefully cleaned comb for me to then store in the basement til Spring.
After two days dripping from the netting bag, it looked like I had about a GALLON of pure honey in the lower bucket- way more than I thought I would get!
I used the spigot to fill various clean jars I had been saving. Honey can be stored just as is in clean jars- no need to 'can' it or process it. Pure honey honey doesn't spoil. Sort of a hodge-podge of jar sizes and shapes, but no matter- the honey tastes WONDERFUL!!! Very potent 'honey' taste, nothing like sugar syrup for sure. I can't detect any distinctive floral notes, but it was made during a time when the Japanese Knotweed and goldenrod were in full bloom around my neighborhood. It does look to me as though we got just about a gallon of honey all told.
After cleaning the buckets and bottling area of the kitchen, I placed the leftover grapefruit-sized clump of wax crumble-goo into a doubleboiler saucepan, with about a cup of water. It was quite gooey, but you couldn't really squeeze any honey out of it anymore. I gently heated it in the double boiler til the whole thing was liquid. I stirred and scooped a little strainer through it to remove the brownish globs of pollen residues that had been in some of the comb cells. As soon as it cooled, a beautiful bright yellow disc of pure beeswax formed and floated on top of the now dark honey-water. The two layers were perfectly separated. When cool, I merely lifted the hard wax disc off the top and you can see how lovely it is- enough to make about three votive candles I'm guessing! I think I'll order some wicks, I'll need them next year anyway. Once I took off the beeswax, I put a cookie tin out in the vegetable garden and poured the leftover honey-water in it for the bees to drink- They can evaporate and recycle it into honey for their own winter use. Before I had even finished pouring it into the cookie sheet, two girls were already at the edge of the pan, drinking! I lay some pine branches in the liquid to give the bees places to crawl out and not drown. Nothing went to waste.
I love knowing that there have been no chemicals at all added to the hive or treated on my bees. I can't control the things my bees may get into out in the surrounding neighborhood, but this honey is from completely untreated bees foraging food all on their own, and that means a lot to me. We live in a small rural village surrounded by many farms, fields and hills of wild flowers, forests, etc. Plenty of bee forage of all kinds here.
If you click on a picture it was enlarge.


In my 3 seasons of keeping bees, I think probably the most profound thing I have learned is this:
A beehive is not a permanent thing. Colonies survive and die, all workers die within 8 weeks and are replaced by an entirely new population of bees, queens get replaced or swarm off... your boxes may stay there appearing unchanged, but in reality the bee colony inside is a work in progress that is constantly evolving and changing, with or without your actions. So have fun with your boxes of insects and learn cool stuff by creating and un-creating new colonies!Think of all your colonies with less than 10 frames as 'experimental temporary holding boxes'- they can be viewed as not actual hives. Call your nucs 'comb producing boxes' or 'brood booster boxes'. That way, you can keep claiming you only have 3 hives in your backyard and you can have fun with various other 'experimental colonies' piled here and there. ;D Then in the Fall some will have faded out and the healthiest ones can be consolidated or just disassembled if you choose and used to boost your REAL hives for the winter. Or bundle them up against the wind and see if any survive the winter. If you go into winter with a couple of extra cards up your sleeve, you are more likely to have survivors in the Spring to work from. This is the most valuable thing I have learned so far.


